Part 1: Calibrating an Analytics Camera Can Be Easier Than You Think
Filed under: IP Cameras, Analytics
Analytics-enabled cameras are becoming an essential part of many surveillance solutions. Their ability to detect and alert you to things like motion, intrusion and loitering sees them widely used by the military, government agencies and critical infrastructure providers.
But thanks to recent innovation, the appeal of analytics cameras has spread. Many organizations are now deploying analytics cameras to gain valuable insights into their business.
With our MegaPX Indoor Analytics Dome, for example, banks and retailers can perform people counting, queue length monitoring and customer dwell time analytics. Analyzing this information over time gives them valuable insights into customer behavior, store or branch performance, marketing metrics and more.
If you’re a security integrator, you may have had an unpleasant experience trying to set up an analytics camera in the past. Depending on the camera, the environment and the analytic, the process can be lengthy and complicated. If not done correctly, the setup can also result in the analytics generating inaccurate data.
Unlike some analytics cameras, the MegaPX Indoor Analytics Dome is easy to set up and calibrate, thanks to a unique software feature we’ve created that automates much of the process. In fact, the entire setup can be done in just minutes, as we’ll explore in this blog.
Before we begin, however, there are a few key things to consider.
Choose Your Analytic and Camera Placement
Before doing anything, you need to decide which analytic you’re going to use: people counting, queue length monitoring or customer dwell time. This will determine your camera placement and configuration method.
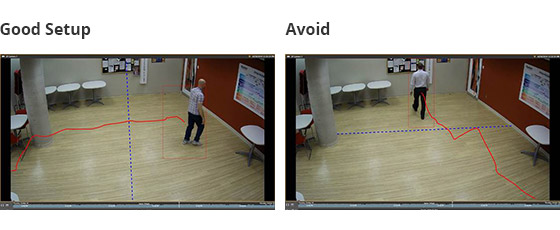
Once you’ve selected your analytic, take some time to consider your camera’s mount location and field of view. This decision is critical to the camera’s ability to deliver accurate analytics, so choose your placement wisely. Examine the flow of customer traffic and mount the camera so people are always moving horizontally (left to right or vice versa) through the field of view. Avoid camera angles that capture traffic flowing vertically through the field of view.
Once your camera is in place, you can begin to set your camera’s perspective. Start by logging in to the camera. In the navigation menu, select the analytics plugin. Under General Settings, select Camera Calibration.
Step 1: Select your camera setup
Choose the setup you’ll be using, either tilt or overhead shot. This choice will depend on the analytic you’re going to perform. The overhead shot is best for people counting, while the tilt shot can be used for any of the three business analytics.
Step 2: Select your caliber length
I recommend using the measurement strips that come with your March Networks analytics camera. But the caliber can be any horizontal element on your scene that’s aligned with your camera’s field of view, as long as it’s set evenly across different parts of your scene in a triangular pattern (for example, in the foreground, middle, and background). You must select a minimum of three calibers – all with the same dimensions.
Once you’ve selected your caliber length, take the objects (or the measurement strips if you’re using them) and lay them out on your scene floor. Remember to space them out in the foreground, middle and background of your scene.
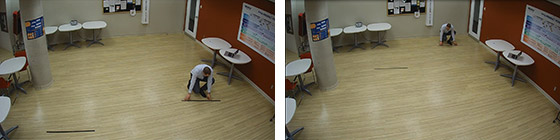
Step 3: Draw your calibers
Using the software, click on the calibers in the menu, draw them out and drag them over onto your field of view to line up with the physical calibers you’ve placed on the floor. This process allows the camera to set the perspective of the scene.

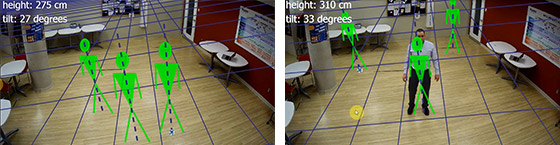
As you’re doing this, the camera will begin to calculate the size of the room. Test men – green stick figures – will appear in the software to help test your perspective. Stand in your scene alongside the test men to ensure your proportions are correct.
Step 4: Test your accuracy
If you’ve set the perspective correctly, the grid that appears on your scene should reflect your scene’s perspective (i.e. the blue lines should follow the perspective plane of the scene). Objects in your scene (or the test men) should also keep the same basic proportions.
Once you have the correct perspective, save your settings.
The last step in the process is to configure your analytic. Read Part 2 of this blog to learn how.
After you’ve configured and tested your analytic, and adjusted the sensitivity, you’re now ready to use your analytics camera.
For more on this subject, watch this helpful video tutorial.
Have something to add? Give us your feedback below.